CSS !important: Don't Use It. Do This Instead
2018-08-27Though the option is available at our disposal, most experts consider the use of the !important declaration (or !important tag) as an anti-pattern. If you’ve spent any amount of time writing CSS, you have (or certainly will) come across a situation where your styles “aren’t working like they’re supposed to!”
In these cases, you might be tempted to add “!important” to the end of your style and be done with it. However, in this post, you’ll learn why this is rarely a good idea, and more importantly, how to simply avoid using !important in your CSS.
There’s quite a bit to cover here. Go ahead and grab a cup of coffee and prepare for some code examples.
What does the !important tag actually do?
When you’re just starting with CSS, the !important tag seems like a secret weapon that you can pull out when styles aren’t working as expected. This situation occurs when you’re trying to override styles that are declared somewhere else in your CSS.
For example, let’s imagine you want to italicize everything that appears inside of <blockquote> elements.
blockquote * {
    font-style: italic;
}
And for some reason it’s not working as you would expect, so you add !important and everything is fine! It’s like magic!
blockquote * {
    font-style: italic!important;
}
What you’re actually doing in this case is increasing the specificity of everything inside blockquotes to an unreasonably high level.
By using !important, you’re essentially telling the browser that, under no circumstances should elements inside of blockquotes ever be anything other than italic.
This is a mistake. Let me explain.
Why you should avoid using !important in your CSS
Using the same scenario as above, let’s imagine 6 months go by and another developer on your team needs to “unitalicize” (for lack of a better word) blockquote text in some cases…such as citations. This is the first attempt:
<blockquote>
    <p>Don't write lazy CSS</p>
    <cite>- Abraham Lincoln</cite>
</blockquote>
cite {
font-style: normal;
}Despite declaring a normal font-style specifically for the element, the text is still italicized.
Don’t write lazy CSS
- Abraham Lincoln
Under normal circumstances, this would override the font-style that is set for the element, but it’s not working as expected!
The developer may even try adding a class or an ID to the element, only to discover that nothing will override the italicized text.
At this point, the only option is to add an !important tag to force the style to apply.
cite {
    font-style: normal!important;
}
And the viscous cycle begins.
The only thing that can override an !important tag is another !important tag. By using it one once, you potentially end up with a CSS file that is full of !important tags, which is not ideal.
If all your styles are !important, then none of your styles are important.
Fortunately, there is a better way to solve this dilemma. To get there, let’s go back to the basics and see how source order, inheritance, and specificity work together.
The source order rule
Source order is the first rule that determines which CSS style takes precedence. When overriding styles for a CSS selector, this rule should be taken into consideration first.
Source order refers to the order your styles are written. When you declare two different styles for the same selector, the declaration that appears last in your CSS file takes precedence.
<blockquote>
    What happened to the text?
</blockquote>
blockquote {
font-style: italic;
color: yellow;
}
blockquote {
color: pink;
}The color property for the <blockquote> element is defined as yellow first and pink second. The result will be pink because of the source order rule.
What happened to the text?
There are three important things to point out in this example.
- Every new
<blockquote>element that is added to the HTML will have a pink color. - The second blockquote selector does not void the font-style property of the first since it’s never redefined. Instead, the styles accumulate.
- Since the
<p>element is a child of the<blockquote>element, it is inheriting the font-style property that is applied to the blockquote.
The source order rule is our “weakest” option to override styles. If you’re stuck trying to understand why you’re styles aren’t being applied, check to see if the same styles are applied later in the CSS file first. If so, consider removing or rearranging the order of the last style declaration to fix the problem.
If you’re using multiple stylesheets, the order of your stylesheets will also affect the source order. Make sure any stylesheets that are referenced later in the HTML do not contain the same styles you’re trying to override.
The inherited property rule
Inheritance allows a child element to inherit styles from a parent element. When we need to override inherited styles, it can easily be done by targeting the child element in our CSS.
In the previous example we saw how source order determined the background color for the blockquote element. It’s safe to say that we can expect the same outcome if we apply a new value for the font-style property too.
<blockquote>
    <p>What happened to the text?</p>
</blockquote>
blockquote {
font-style: italic;
color: yellow;
}
blockquote {
font-style: normal;
color: pink;
}The “normal” font-style that’s declared in the second blockquote selector cancels the “italic” font-style property in the first blockquote selector.
What happened to the text?
However, since the <p> element is merely inheriting the font-style property, we can easily override this style again by targeting the <p> element in our CSS.
CSS
p {
font-style: italic;
}
blockquote {
    font-style: italic;
    color: yellow;
}

blockquote {
    font-style: normal;
    color: pink;
}
The result?
What happened to the text?
Notice that the source order does not dictate the style in this case. Source order no longer matters because we are now targeting a different (and more specific) selector.
This is important to point out because it gives us insight into how specificity works. In this case, styles that are declared specifically for child elements will override the inherited styles of their parent elements.
Note: If you apply the text-decoration property to a parent element, targeting the child element with the same property will not override it. This is because text-decoration is not an inheritable property. It only seems like it is. You can read more about how this works here. You can also see a list of all inheritable CSS properties in this StackOverflow answer.
The specificity rule
Specificity rules take precedence over source order rules. We can apply various levels of specificity by using CSS selectors.
In the previous examples we targeted single HTML elements to declare our styles (blockquote and p). When used as selectors, HTML elements have the lowest specificity (with one exception, which is discussed later). This makes it easy to override element selectors by using a different selector.
With CSS we have the ability to “select” our HTML in a variety of ways. We can use the following selectors, or a combination of these selectors, to tell the browser specifically what we’re trying to do:
- *
- ids
- classes
- pseudo-classes
- attributes
- elements
- pseudo elements
Each selector carries a different “weight,” which helps browsers understand which styles should take precedence. In this example, we’ll override our <p> element styles by introducing a class.
First, let’s change our CSS up a bit and focus on overriding font colors.
CSS
p {
    color: lightgreen;
}

blockquote {
    color: lightblue;
    background: black;
}
As we know from the previous inheritance example, the font color assigned to the <p> element (light green) will override the inherited font color (lightblue) of the blockquote.
What happened to the text?
Now, let’s add a “text” class and set a different value to its color property.
.text {
    color: yellow;
}

p {
    color: lightgreen;
}

blockquote {
    color: lightblue;
    background: black;
}
Also, let’s make a few changes to our HTML by
- adding a
<span>element to see what happens - adding a new
<p>element with the “text” class applied
<blockquote>
    <span>What happened to this text?</span>
    <p>What happened to this text?</p>
    <p class="text">What happened to this text?</p>
</blockquote>
The result?
What happened to this text?What happened to this text?
What happened to this text?
Let’s break down what is happening here (from top to bottom):
- A font color of “lightblue” is applied to the
<div>element. Since no font color is declared for a span selector, our<span>element inherits the lightblue font color from the parent. - A font color of “light green” is applied to the
<p>element, which overrides the inherited “lightblue” font color from the parent element. - A font color of “yellow” is applied to the “text” class, which overrides the “light green” font color of the
<p>element, which overrides the “lightblue” font color of the parent element.
Makes sense right? After source order is taken into consideration it’s clear that priority goes from inherited styles to element selectors to class selectors.
It can get much more specific than that though. Let’s see how adding an ID to the mix will impact specificity.
First, let’s add an ID of “words” to our CSS and set the font color to light blue.
#words {
    color: orange;
}

.text {
    color: yellow;
}

p {
    color: lightgreen;
}

blockquote {
    color: white;
    background: black;
}
And we’ll add another <p> element with both the “text” class and the “words” ID applied.
<blockquote>
    <span>What happened to this text?</span>
    <p>What happened to this text?</p>
    <p class="text">What happened to this text?</p>
    <p class="text" id="words">What happened to this text?</p>
</blockquote>
The last <p> element now has 4 different font color properties being thrown at it. Which style will our new <p> element take?
What happened to this text?What happened to this text?
What happened to this text?
What happened to this text?
In this example, the ID font color overrides the class font color because it’s a more specific selector.
But wait. We’re still not done. You can still override your ID selectors too! Let’s duplicate our last <p> element and add an inline-style to it, setting the font color to pink.
<blockquote>
    <span>What happened to this text?</span>
    <p>What happened to this text?</p>
    <p class="text">What happened to this text?</p>
    <p class="text" id="words">What happened to this text?</p>
    <p class="text" id="words" style="color:pink">
        What happened to this text?
    </p>
</blockquote>
Which results in this:
What happened to this text?What happened to this text?
What happened to this text?
What happened to this text?
What happened to this text?
As you can see, the font color applied to the inline-styles overrides the ID selector’s font colors. Inline-styles are more specific than IDs.
And that’s when we get to the !important tag. The !important tag is the only way to override an inline style. To illustrate, let’s add an !important tag to the p selector styles and see what happens:
#words {
    color: lightblue;
}

.text {
    color: yellow;
}

p {
    color: lightgreen!important;
}

blockquote {
    color: white;
    background: black;
}
And we get…
What happened to this text?What happened to this text?
What happened to this text?
What happened to this text?
What happened to this text?
All of that specificity between our p selector and our inline-style is wasted! The only way we can override the color of our <p> element now is with additional !important tags that are applied later in our CSS.
The levels of specificity explained
As mentioned, each CSS selector carries a different “weight.” Browsers use to this weight to determine which styles should have priority. The weight is represented by a calculated specificity score between 0.0.0.0.0 and 1.0.0.0.0.
| Score | Selector |
|---|---|
| 0.0.0.0.0 | * |
| 0.0.0.0.1 | element or pseudo-element |
| 0.0.0.1.0 | class, pseudo-class, or data attribute |
| 0.0.1.0.0 | ID |
| 0.1.0.0.0 | Inline style |
| 1.0.0.0.0 | !important |
In the chart above, we can see the least specific (0.0.0.0.0) selector to most specific (1.0.0.0.0) selector.
Note: Technically, inline-styles and the !important declaration are not selectors, therefore you’ll usually see this score represented with only three placeholders decimals (i.e. 0.0.0). However, the chart above is still helpful to understand the levels of specificity.
With this in mind, it should be noted that you should use both ends of this spectrum with caution.
We’ve already discussed why you should avoid using !important tags, but in many cases the * (or select all) selector should be avoided as well for performance reasons.
This implies that there is kind of a “sweet spot” in the middle that you should try to stick too. As such, you’ll notice most stylesheets utilizing classes, pseudo-classes, and attributes more often than the other selector types.
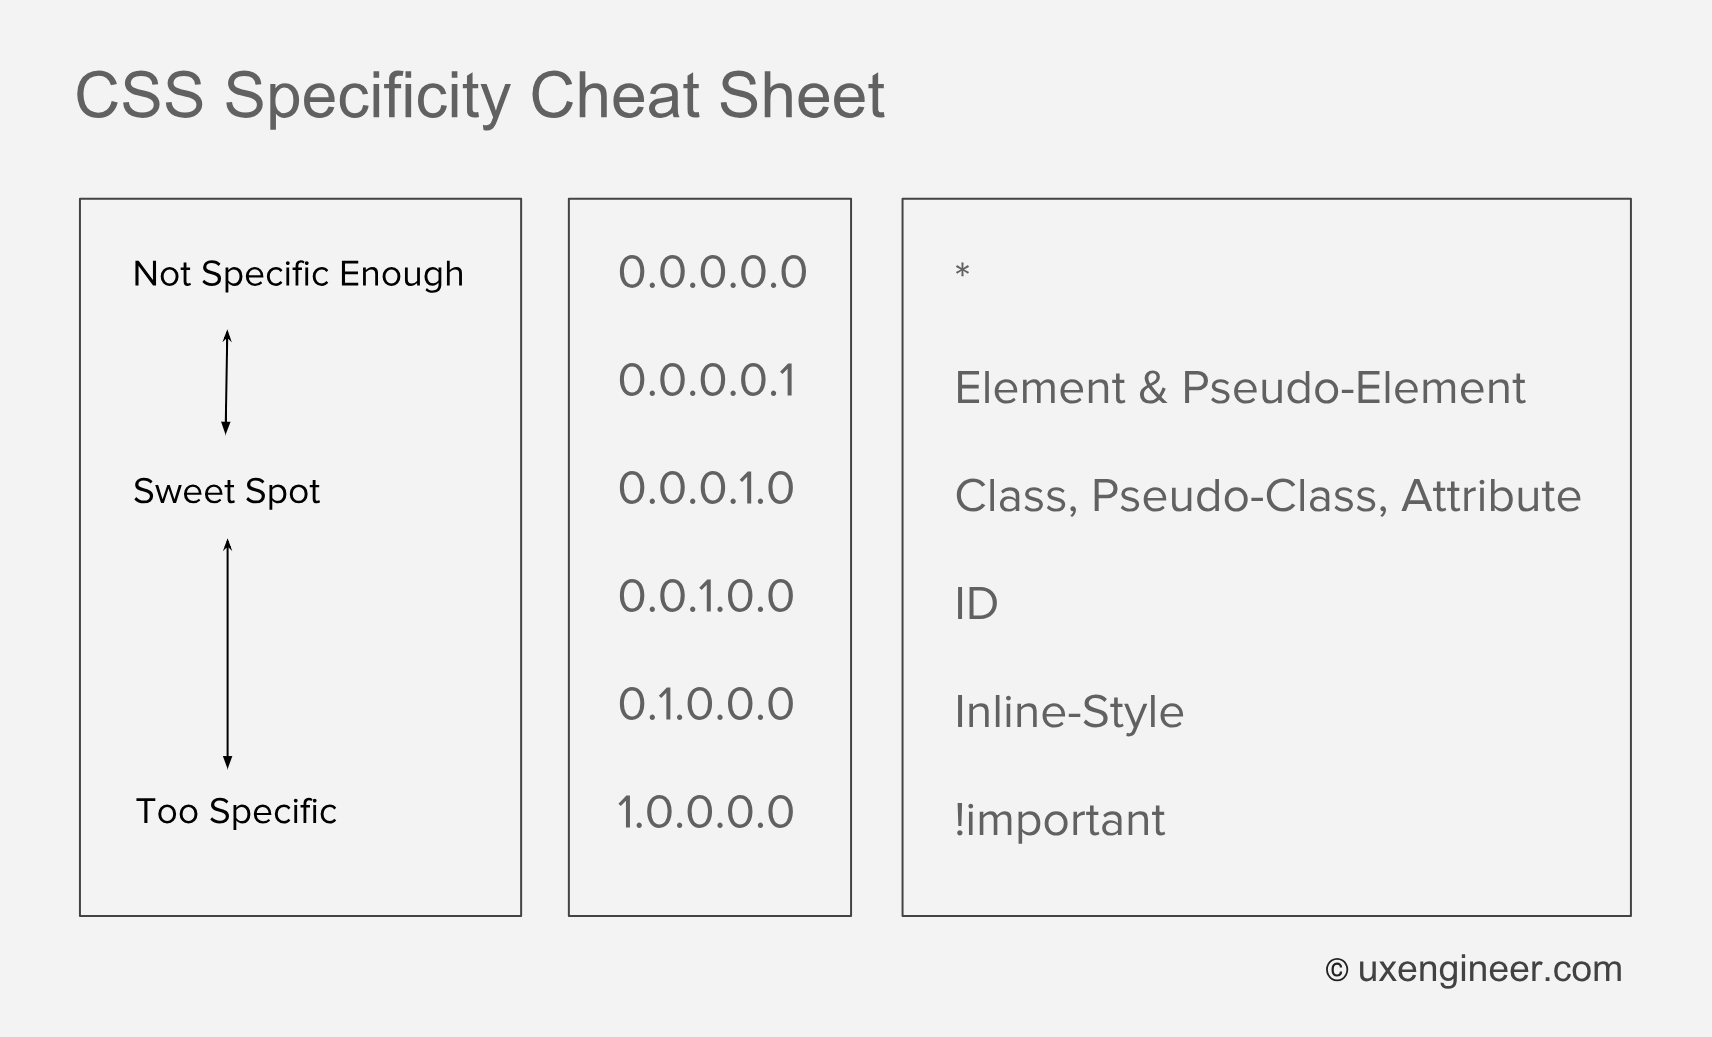
// Specificity Cheat Sheet

// Not Specific     0.0.0.0.0   *
// ............     0.0.0.0.1   Element & Pseudo Element
// Sweet Spot       0.0.0.1.0   Class, Psuedo Class, Attribute
// ............     0.0.1.0.0   ID
// ............     0.1.0.0.0   Inline Style
// Too Specific     1.0.0.0.0   !important
The cheat sheet above can help you find a good starting point with CSS specificity. In general:
- The * selector should be avoided for performance reasons.
- Element selectors are useful for creating base styles.
- Classes are in the “sweet spot” of specificity
- IDs should be reserved for “unique” styles.
- Inline-styles should be reserved for rendering critical CSS.
- The !important tag should only be used when you’re absolutely sure about it.
But wait there’s more…
Applying incremental specificity
The specificity scores above illustrates how each selector represents a new “level” of specificity. If you can’t override a class by adding a new ID, then how are you supposed to override it? This is where incremental specificity comes in handy.
For example, let’s imagine we have the following HTML
<div id="content">
    <div class="box">
        <span class="text">Some text</span>
    </div>
    <div class="module">
        <p class="text">Some more text</p>
    </div>
</div>
The “text” class has already declared in your stylesheet.
.text {
    font-style: italic;
    text-decoration: underline;
    color: cyan;
}
Which looks like this:
Some more text
You want to keep the underline and the italic styles, but you want to change the font color of the text inside the “module” div to red without affecting the cyan font color inside the “box” div.
Because of the source order rule, we already know that doing something like this will change the text to red for all elements with the “text” class, which is not what we want.
.text {
    font-style: italic;
    text-decoration: underline;
    color: cyan;
}

.text {
    color: red;
}
Some more text
However, since our “text” class is applied to a <span> element AND a <p> element, we can achieve incremental specificity by adding the p selector.
.text {
    font-style: italic;
    text-decoration: underline;
    color: cyan;
}

p.text {
    color: red;
}
By targeting both an element and class, we’ve incrementally changed our specificity value from 0.0.0.1.0 to 0.0.0.1.1, which results in this:
Some more text
However, if for some reason we decided to replace our <span> element with a <p> element, then we’re stuck with the same problem as before.
<div id="content">
    <div class="box">
        <p class="text">Some text</span>
    </div>
    <div class="module">
        <p class="text">Some more text</p>
    </div>
</div>
Some more text
So how can we increase the specificity even more? We can target the “text” class within the “module” class instead.
.text {
    font-style: italic;
    text-decoration: underline;
    color: cyan;
}

.module .text {
    color: red;
}
This increases our specificity from 0.0.0.1.0 to 0.0.0.2.0 because we are now using two classes in our selector. Our styles are now back where we want them to be.
Some more text
To drive the point home, let’s imagine that we have to create another <div> element with the “module” class. However, in this particular case we want to keep our cyan font color.
<div id="content">
    <div class="box">
        <p class="text">Some text</span>
    </div>
    <div class="module">
        <p class="text">Some more text</p>
    </div>
</div>
<div class="module">
    <p class="text">Some more text</p>
</div>
Will result in this:
Some more text
Some more text
Option 1: We can reach up to the next selector (the ID) to achieve more specificity.
.text {
    font-style: italic;
    text-decoration: underline;
    color: cyan;
}

#content .module .text {
    color: red;
}
This will only target the text inside the content div and increase our specificity value to 0.0.1.2.0.
Option 2: We can introduce a “text-red” modifier class to the second <p> element.
<div id="content">
    <div class="box">
        <p class="text">Some text</span>
    </div>
    <div class="module">
        <p class="text text-red">Some more text</p>
    </div>
</div>
<div class="module">
    <p class="text">Some more text</p>
</div>
.text {
font-style: italic;
text-decoration: underline;
color: cyan;
}
.text.text-red {
color: red;
}This will keep our specificity value to 0.0.0.2.0, but still solve our problem.
Both options 1 and 2 will achieve the desired result:
Some more text
Some more text
Conclusion
As you can see, when you’re styles aren’t “working like they’re supposed to” you don’t have to resort the !important tag. You have other options. In fact, it’s strongly recommended that you avoid using the !important tag in the vast majority of cases.
Hopefully this guide has helped you understand how source order, inheritance, and specificity all play a role in determining how your styles work “behind the scenes.”
More importantly, hopefully this guide has helped you understand how to use these rules to your advantage when writing CSS.
If you found this post helpful, consider subscribing to UXE Weekly. You’ll receive the latest UX Engineer content directly to your inbox [almost] every week!


